Archlinux installation process on Dell XPS 15 7590 2023-11-27
I am once more installing Archlinux after my SSD fried. I had documented the process last time I did this in a list of bullet points, this article meant to formalize it a bit more.
This is mostly targeted at my future self, so all the software, config, and procedure will be tailored to my needs. Other people might find some value in it though, so I'm putting it out there.
A lot of the information in here is also available in the Archlinux installation guide.
Create a live USB
We first need to prepare a bootable USB with the latest iso image, which you can find here.
Do make sure to verify the checksum of the image after downloading it. While it's rare, I have been burned beforeby a corrupted image, and it's not fun to debug issues for hours before realizing that the error was in the very first step, and was easily avoidable. Check the output of this command against the checksum on the download page (search for SHA256):
Then plug in your USB stick, make sure it doesn't contain important data, and figure out
its device name somehow.
I used sudo dmesg, which should show the device name around the time you plugged it in:
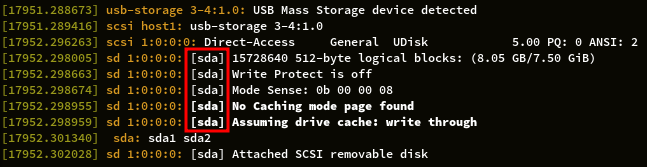
In my case, my device is named /dev/sda.
Note the distinction between the device name and the partition names.
In my case, the device name is /dev/sda, and the partition names are /dev/sda1 and
/dev/sda2.
Then, use dd to write the iso image to the USB stick:
# make sure the USB stick is not mounted
# note that the dd command targets the device, not one of its partitions
# make sure all the data is properly written
Boot from the USB stick
You can then extract the USB stick and plug it in the computer where you want to install Archlinux. Restart the computer, and adjust your BIOS settings if necessary:
- disable secure boot
- configure the SATA controller to use AHCI mode
You can then boot the USB stick. Set your keyboard layout and time zone:
Connect to the internet:
# check whether your network interface is up
# turn it on if it's not
# connect to your wifi
# iwctl commands:
# device list
# station wlan0 scan
# station wlan0 get-networks
# station wlan0 connect <SSID>
# station wlan0 show
# check that you're connected
Pro tip: tab completion works on the SSID, you don't need to type it all out.
Get a GUI
I don't like using fdisk or parted to manage my partitions, I'd much rather use gparted, which is a graphical interface for parted. I also don't want to type out all of the install commands, I prefer to copy-paste them. For these reasons, we'll get a GUI up and running as soon as possible.
# resize the root partition on the fly to make room for packages
# refresh the package list
# install a display server, a light weight desktop environment and a browser
# configure Xorg to start xfce
# start the graphical session
From there, we can use the browser to copy commands into the terminal.
If, for some reason, you need to get back to the tty, you can use Ctrl+Alt+F2.
# set the keyboard layout in the X session
Partition the disk
Next, we'll create all of our partitions. I use Windows on a dual boot (already installed), I'll try and not break it.
Here are the partitions I want:
/bootto contain the linux kernels and initramfs, 1GB/for the system, 100GB. Should be more than enough, the main reason I'm giving it that much is for docker stuff that can quickly take up a lot of space/homefor my personal files, 150GB. Separate from/so I don't lose it all if I ever need to reinstall the system- a swap partition with the same size as my RAM, so I can see things slowing down before they get oom-killed if I use up all my RAM
/media/datafor any big files, formatted in NTFS and shared by Windows and Linux
I don't like using fdisk or parted as I find it to easy to break things and hard to keep track of what I'm doing, so I'll use gparted, which is the main reason why I wanted a graphical session:
# install gparted
# run it
As you can see, Windows already created a few partitions of its own. We will be adding an entry in the EFI partition to boot Archlinux, and reducing the size of the main windows partition. I don't know what the other two partitions are for, but they're tiny so I'll leave them be.
The first step is to resize the Windows partition.
You should do this from Windows instead, if you don't want to run into the same issues I did.
I reduced it to 150GB, which is more than it currently needs but leaves some room for it
to grow.
I like to reboot here into Windows to make sure it is still working fine, even if it
means redoing all of the previous preparation steps.
It is usually easier to fix issues as early as possible, rather than do a bunch of
changes at once and not know which one caused the issue.
That was a good shout, because Windows got stuck in a loop of trying to repair disk
issues and rebooting. I solved this by running bootrec /FixMbr in the command prompt
available in Windows' recovery tool, but it is probably better to resize the partition
from the official Windows utility instead (not sure how it would handle resizing the
partition it is currently running on though).
If that doesn't work for you, you could try one of the other solutions suggested
here.
Here is the list of partitions I created, with names and labels always with the same value:
arch_boot: 2GB, fat32, for the kernels and initramfs. Once created, right click > manage flags > tickbls_bootto make it anarch_root: 100GB, ext4, for the systemarch_home: 150GB, ext4, for my personal filesswap: 16GB, same size as RAMdata: everything else, NTFS so Windows can also use it
Once the changes are applied, we can reboot to make sure Windows can see and use the new data partition.
Install the system
We'll start with mounting all the partitions.
# set variables so we don't have to remember which partition is which all the time
# mount the partitions
The Archlinux wiki explains in
great detail the various ways to handle the EFI partition.
I'll go for the second typical mount point described there: mounting the EFI partition
to /efi.
Install the base system, after making sure you will be using a mirror close to you:
We'll then use genfstab to make sure all the partitions we just mounted are always
mounted automatically in the new system.
We can now chroot into the system and configure it more.
# chroot into the new system
# enable colors in pacman
# upgrade everything
# update your processor microcode if necessary
# configure the timezone
# sync your system time with the internet
# set the hardware clock to UTC
# uncomment the locale you want to use in this file, and install it
# en_DK.UTF-8 uses ISO date format (yyyy-mm-dd)
# make your keyboard layout in the console persistent
# set your hostname
# set your root password
You might need to set Windows to use UTC as well.
We'll configure the bootloader with systemd-boot. If you would prefer to use something else, the wiki might have some documentation.
# create your initial ramdisk
# install systemd-boot on your EFI partition
# configure the archlinux boot entry
# don't forget the microcode line if you installed it
# configure the loader
Note that there are two config folders for systemd-boot: /boot/loader and
/efi/loader.
I found this very confusing, but what clarified it for me is this excerpt from the
wiki (with paths adjusted
to the current situation):
systemd-boot will search for boot menu items in
/efi/loader/entries/*.confand additionally in/boot/loader/entries/*.confif usingXBOOTLDR. Note that entries in/efican only use files (e.g. kernels, initramfs, images, etc.) in/efi. Similarly, entries in/bootcan only use files in/boot.
We are using XBOOTLDR (this is what setting the bts_boot flag on the /boot partition
did at the gparted step), and the kernels will be installed to /boot, so we need to
put our bootloader entry in /boot as well.
We can now make sure bootctl doesn't report any error:
We'll now configure our main user.
# install sudo for privilege escalation, the shell that will be used by the user, and
# vim for visudo
# create a group for sudoers
# create the user and add it to the sudoers group
# set the user's password
# make members of the sudo group part of the sudoers
# uncomment this line:
# %sudo ALL=(ALL:ALL) ALL
Now on to installing some packages.
For my window manager, I use i3, mainly for the capability to assign workspaces to monitors, and being able to switch workspace on one monitor without anything changing on the other monitors.
I would have liked to have something with a few more bells and whistles, but I didn't manage to adjust the alternatives I investigated to my needs (Gnome Shell with the gnome-shell-extension-dash-to-panel extension, and Hyprland).
# install a backup text editor
# install i3 and related tools
# install some graphical utilities
# install network utilities
# install some command line tools
When given a choice about audio stuff, I went with those:
- pipewire-jack
- wireplumber
I also like to disable the locking system that prevents auth after 3 failed attempts, especially since I tend to juggle between keyboard layouts.
We can now reboot into Windows first to make sure we didn't break anything, then to our new system to finish the configuration.
We haven't configured a display manager yet, so after rebooting into Linux, you'll be
greeted with a tty.
After login, you can just run Hyprland to start it.
Install dotfiles
I'll first start by fetching my dotfiles, to prevent software I install from creating them before I created the right symlinks.
# set your keyboard layout
# install oh-my-zsh and a plugin for it
&&
# generate an ssh key
# add the public key to your git platform
# clone your config files repo
# create symlinks to the config files
&&
# install a vim plugin manager, and install the plugins
Install paru
In order to install packages from the AUR, I use paru.
&&
&& &&
# get the most relevant results at the bottom
Install other packages
# address some of the "missing firmware" warnings during mkinitcpio
# power management tools
# some useful command line tools
# vscode, the MS release as I need some extensions that are only on their marketplace
# some development tools
# python environments manager, so as not to mess with system files
|
# some other tools
Set up a backup kernel
If some kernel update were to break something, it's nice to have a backup option rather than having to fix the issue from the rescue mode. To that end, we'll install the long-term support (LTS) version of the kernel, and add a boot entry for it.
# install the lts kernel
# create the boot entry for it
|
We can then reboot with the new boot entry to confirm that the kernel can be used.
Configure audio
I'll use Pipewire, which should have been installed earlier as a dependency of another package.
# enable sound, approve removing pulseaudio packages when asked
# enable bluetooth
# to control audio input and output
Configure hibernation
We'll use suspend-then-hibernate, where the system saves its state both to RAM and disk. This allows us to have the system immediately available if we wake it up before the hibernate delay, but to preserve more battery if the laptop remains asleep for longer.
First, let's set up hibernation. We'll use a swap file, so that if we do end up using the swap partition, we can still hibernate.
# create a swap file the size of RAM
# format it
# enable swap on it
# add it to fstab
|
# this should now list your swap partition and the newly created file
The kernel needs to know where to check for resume info when waking up from hibernation.
We do so by adding the resume hook to the initramfs and pointing the kernel to the
file.
# add `resume` to the HOOKS array, somewhere after udev, eg:
# HOOKS=(base udev autodetect modconf keyboard keymap consolefont block filesystems resume fsck)
# regenerate the initramfs
# remember which partition is your root partition
# get the UUID of your root partition
# get the offset of your swap file
# output the kernel options you will need
# copy the output of the previous command at the end of the options line in this file
# this will tell the kernel where to resume from
After a reboot, you should be able to hibernate and resume.
# set up a short hibernate delay for testing
# put the computer to sleep, wake it up immediately and note how long it gets to wake up
# set it to suspend then hibernate, wait a bit longer than the delay you set earlier,
# and wake the laptop again
Don't forget to set the HibernateDelaySec parameter to a more sensible value once
you're done with tests:
Now I want my computer to automatically suspend-then-hibernate when I close it:
# change all three "LidSwitch" actions
# make sure clicking on the power button by mistake does turn everything off
I also want my system to be locked whenever I suspend my laptop. I achieved this with a systemd unit file:
|
Configure the GPU
The GPU on this laptop is an Nvidia GeForce GTX 1650 Mobile.
To save battery, I want the GPU to be enabled only when I explicitly require it, and to use the integrated graphics the rest of the time. This can be done with Prime, and we'll be using the nvidia proprietary driver, to avoid some potential issues with nouveau.
Configure the driver
# install some utils
# check what gpu is currently in use, intel graphics in my case
|
# install the drivers for the usual kernel and the lts one
# remove "kms" from the HOOKS array in that file, so as not to load nouveau
# regenerate the initramfs
# configure the driver
|
|
# create a udev rule to turn off the GPU when not in use
|
Reboot and make sure both the usual kernel and the lts one allow you to boot your system properly.
Use the GPU when desired
We can then setup GPU switching with prime:
# make sure you can now use the discrete graphics card on demand
# this should say intel
|
# this should say nvidia
|
You can now check that the GPU gets properly suspended when nothing uses it:
# check that this says suspended
# use the GPU, this should say "nvidia"
|
# this should say "active" for about 10 seconds after the end of the previous command,
# then "suspended" when the GPU is turned back off
Keep in mind that utilities such as nvidia-smi will power the card on even if it is
off, for about 10 seconds.
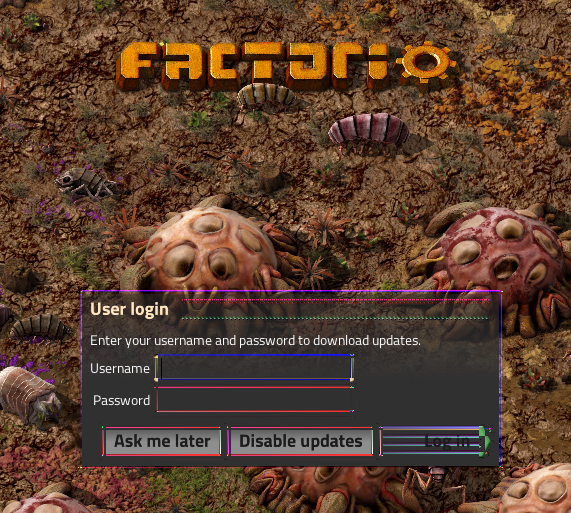
If you use an app launcher that reads .desktop entries, you can run a program on the GPU by default (if run with xdg-open or anything that reads the .desktop entry) by editing the corresponding .desktop entry to use prime-run.
For instance, here is how I did it for Factorio:
The change will be taken into account next time the desktop entry is reloaded, for instance after logging out and back in.
At any given time, you can run nvidia-smi to see what processes are using the GPU.
There is technically a PrefersNonDefaultGPU field in the .desktop
specification,
but the only program I've seen that respects it is Gnome Shell with switcherooctl (not
sure which program is responsible for what there).
It's also limited in that if your default GPU is the discrete GPU, this won't behave the
same as setups that use the integrated GPU by default.
With the configuration described above, there is an issue where if a program is using the GPU when the laptop goes to sleep, it will have glitches when it resumes. This is because the nvidia driver only saves essential video memory allocations, and has to ditch the rest.
This
page
describes two methods that are supposed to fix the issue:
NVreg_PreserveVideoMemoryAllocations and NVreg_EnableS0ixPowerManagement.
I'll describe both here in case you want to try them out, but neither fixed the issue
for me, so I resigned myself to have to restart any program running on the GPU if I need
to hibernate.
The first method using the NVreg_PreserveVideoMemoryAllocations parameter:
# allow turning off the GPU entirely when it's not in use
|
# enable nvidia services
This works for suspend and hibernate, however it doesn't for suspend-then-hibernate, and fails as if the services weren't enabled:
# after a reboot so the kernel module param is taken into account
NVRM: GPU 0000:01:00.0: PreserveVideoMemoryAllocations module parameter is set. System Power Management attempted without driver procfs suspend interface. Please refer to the 'Configuring Power Management Support' section in the driver README.
There is a dirty workaround described here, that consists in replicating the nvidia services' functionality manually.
The solution described in that post requires overriding a script that is managed by the
nvidia package, so I'll instead make a separate script that only handles the pre case.
# disable the nvidia services
# replicate their functionality
|
I still had artifacts upon resuming in programs running on the GPU, so I tried the S0ix method instead. Note that this method would only work if your GPU supports it and your system's suspend state is s2idle.
# remove the script we just created
# use another method of preserving video memory
|
While this fixed the issue for suspend, this didn't solve the glitches after hibernation either, so I just scrapped the idea and will just restart any program that needs the GPU after I hibernate.
I'm not sure if that makes any sense, but just in case I tried combining both methods:
# configure both video memory preservation methods:
|
# enable nvidia services
Sadly I still got glitches, so I abandoned altogether the idea of recovering GPU programs from hibernation.
I ran this to return to the state before this section:
# same as the first time
|
# disable the nvidia services
I had initially set the nvidia driver and modules to early load, by adding them to
mkinitcpio.conf. However, this caused a number of issues with hibernation, that are
described here.
I'll copy here the steps I initially took to make that work, but keep in mind this won't play nicely with hibernation.
# add "nvidia nvidia_modeset nvidia_uvm nvidia_drm" to the MODULES array, and add
# the udev rule to the initramfs, by adding /etc/udev/rules.d/80-nvidia-pm.rules
# to the FILES array
# regenerate the initramfs
# make sure the initramfs is always regenerated after a driver update
|
Update firmware
We'll install firmware updates if any are available. Note that you must be connected to AC power for many of them.
# install a firmware updater and a GUI for it
# download metadata
# check for available updates
# install updates, if any
Other misc configuration
Enable a thunderbolt device:
# authorize a thunderbolt device
Themes, fonts, icons:
# install more fonts
# install more gtk themes
# install nicer-looking cursors
# install nicer-looking icons
# install a utility to switch gtk themes
# make sure autorandr is run when lightdm starts
Wallpaper stuff:
# install a wallpaper utility
# set a wallpaper on login, and change it once in a while:
# customize the login screen, note that wallpapers should not be in /home
Install Steam: