Create a Lambda in Rust using Terraform 2023-11-05
This blog entry will take you through the steps of creating an AWS Lambda in Rust, and deploying it to AWS via Terraform.
The code showed in this article is hosted on Github. Each section has its own commit, so you can easily follow along with the repo.
I am very much a beginner in Rust, so any feedback or suggestion for improvement is most welcome.
We will assume that you have rust already set up, as well as Terraform and the AWS CLI. Those three commands shouldn't error out:
You can initialize a project with:
The core function
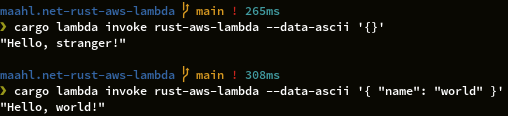
Let's start by implementing the core functionality of our lambda: it will greet either a name if provided, or "stranger".
Edit src/main.rs:
You can try out the code with cargo run.
To ensure that our function behaves as intended, we'll add some unit tests to it. The tests cover both the case where a name is provided, and not.
The tests can be run with cargo test.
Cargo Lambda
The Rust runtime for Lambda is best interacted with using Cargo Lambda.
This tool will let you build and run your function locally, including with hot-reloading. It can also be used to bootstrap a lambda or deploy it, but we won't use these capabilities here.
A note on cargo lambda deploy: unfortunately, the Rust AWS SDK does not implement
sso_session yet.
If, like me, sso_session is how you authenticate to AWS from the command line, you're out of luck.
Support for it might come soon,
though.
If I remember by the time that is released, I will edit this post to include details
on how to use Cargo Lambda's deploy function.
Check out the installation method that best suits you, but keep in mind that you will likely want to use an installation method that also provides zig, for handling cross-compilation. I went for pip:
Once cargo-lambda is installed, we can get started on wrapping our core function in Lambda-related stuff.
Interacting with the Lambda runtime
The Lambda runtime expects an async function that takes as parameter a LambdaEvent and
returns some JSON.
We will thus have to add a few dependencies to our project: an async runtime, the Lambda
runtime, and serde, to serialize our response to JSON.
Our core function needs to be wrapped in a function whose role will be to extract the relevant values from the incoming Lambda event, call our core function, and convert its response to JSON.
async
Our main function must be updated to run the wrapper, which requires it to be async and
return a Result.
async
At this point, cargo run won't do you much good anymore. Cargo Lambda will help us
instead, by spawning a web server that will listen to incoming requests, and invoke the
Lambda to process them. It will also recompile and hot-reload the Lambda upon detecting
a change in its source files. You will also see any log messages in the output of the
server.
The wrapper should also be tested, using the tokio::test attribute instead of the
usual test, as it is async.
async
async
A more structured response
At the moment, our response doesn't go through any validation: we could send back a JSON of any structure. We can, however, leverage Rust's strong typing to do the work for us. We just need to make our core function return a structure that can be serialized to JSON.
The tests will also need some adjustments that you can find in the git commit.
Logging and tracing
To gain some visibility into how our Lambda operates, we should add some tracing to it. Tracing is basically structured logging, and where a log line represents a moment in time, a trace represents a period of time. The tracing docs explain the concept better than I could.
We just need to initialize the tracing subscriber in our main function:
async I've only included some basic options, but this page contains a number of useful ones that you can experiment with. The output of this project will definitely contain some redundant information when the logs are sent to Cloudwatch.
In order to use the tracing framework, we add the instrument attribute to the wrapper
function.
This will create a span for each invocation of the lambda, and any log event sent from
within that function will be assigned to the corresponding span.
async Deploy with Terraform
A simple Terraform snippet can create our Lambda function and everything else it needs on AWS.
I added it to infra/rust_lambda.tf:
module "lambda_function" {
"terraform-aws-modules/lambda/aws"
"rust-aws-lambda"
"Create an AWS Lambda in Rust with Terraform"
"provided.al2"
["arm64"]
"bootstrap"
false
"../target/lambda/rust-aws-lambda/bootstrap.zip"
}
I used this Terraform module for convenience, as it also handles all the boilerplate, such as a Cloudwatch log group, an IAM role and a policy. Of course, if you need to tailor these to your needs, you can adjust the arguments to that module, or create those resources yourself.
We need to use the provided.al2 runtime, and I chose the arm64 architecture, as it
should be cheaper, according to
AWS:
Lambda functions that use arm64 architecture (AWS Graviton2 processor) can achieve significantly better price and performance than the equivalent function running on x86_64 architecture.
The Lambda must be compiled for arm64 and zipped. Cargo Lambda can help us once again, provided you have Zig available (should have been installed along with Cargo Lambda if you chose a suitable installation method).
You can then create your infrastructure with the following commands:
AWS_PROFILE=<your_profile> terraform -chdir=infra
# make sure the plan makes sense to you
AWS_PROFILE=<your_profile> terraform -chdir=infra
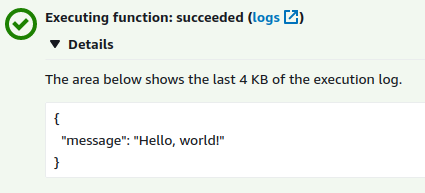
Going to the AWS Lambda console will allow you to test your Lambda with a custom event, which should now work.
The Lambda at this stage is not automatically recompiled when we run terraform apply,
we have to do that ourselves by re-running the cargo lambda build command.
This should be solvable by making the lambda depend on a null_resource (or terraform_data from terraform 1.4), that will be triggered on changes to any of the source files.
I tried to do that, but I started running into issues of Provider produced inconsistent final plan.
While investigating that, I stumbled upon this
comment by
a member of the Hashicorp github organization, which explains that building artifacts is
kinda supported but not really encouraged, and that the recommended way is to build
stuff in a separate build step before terraform comes into play, so we're gonna do that.
Here's the code for my failed attempt, in case you want to take a stab at it yourself:
locals { }
}
# regenerate the release zip when a change to the source code is detected
local.lambda_source_files_hashes
provisioner "local-exec" {
".."
<<-EOT
cargo lambda build --release --arm64 --output-format zip
EOT
}
}
This will also need a depends_on = terraform_data.build_lambda in the
module.lambda_function resource.
Dockerize the Lambda
If, for some reason, you need to run your Lambda from within a Docker image, this Dockerfile should get you going:
# Use a multi-stage build to minimize the size of the final image
FROM rust:1.70-bookworm AS builder

WORKDIR /build

# Installing cargo lambda with pip also installs zig
RUN apt update && \
    apt install -y python3-pip && \
    pip3 install cargo-lambda --break-system-packages

COPY Cargo.toml Cargo.lock ./
COPY src ./src

RUN cargo lambda build --release --arm64

# The final image will only contain the resulting binary
FROM public.ecr.aws/lambda/provided:al2-arm64

COPY --from=builder /build/target/lambda/rust-aws-lambda/bootstrap /bootstrap

ENTRYPOINT ["/bootstrap"]
Build it with:
The multi-stage build allows us to minimize the size of the final image: from 2.64GB when everything is done in a single image without cleanup, to 343MB with the multi-stage build, where the final image only contains the compiled binary.
cargo-chef is a tool that
allows caching compiled dependencies. I tried to fiddle with it to get it to work in
combination with cargo-lambda, unfortunately unsuccessfully; the cargo lambda build
command was not making use of the pre-built dependencies.
If you manage to get that to work, I'm all ears! Cargo chef supports compiling with cargo-zigbuild, and setting the target architecture, so in theory getting both tools to play nicely with each other sounds possible.
Deploying the containerized Lambda with Terraform doesn't have anything specific to Rust, so I'll just refer you to this blog post that explains the process for any dockerized lambda.
Bonus performance improvements
After I posted a link to this post on Reddit, u/HenryQFnord gave some useful feedback to improve this code.
First off, we can configure our release build by adding this section to Cargo.toml:
[]
= "z"
= true
= 1
= "abort"
= "debuginfo"
opt-level = "z" tells the compiler to optimize for binary size.
lto stands for "link-time optimization", and setting it to true (same as
setting it to fat) enables optimizing for binary size across all of the crates in the
project's dependency graph, at the cost of compile time.
codegen-units controls the number of parallel jobs used to compile crates, which
speeds up compilation but means we may miss out on some optimizations. Setting it to 1
means we'll get the best possible optimizations, again at the cost of compile time.
panic = "abort" is useful if you don't need to clean up any resource after a panic
(which can be done in a
catch_unwind): it will
skip the unwinding phase entirely.
strip = "debuginfo" will strip the debug symbols from the binary, which will reduce
its size. You can also set this to symbols, but the gains aren't nearly as dramatic.
Adding all of these options took us from a 3.6MB binary to a 1.8MB one, which should speed up the cold start of the Lambda. According to my very scientific tests consisting of measuring cold start times a couple of times for both versions, we went from 20ms on average without the optimizations to 17ms on average. That's not much, but the effect should be a lot more noticeable on larger programs with more dependencies; our Lambda is as barebones as it gets.
You can read more about each of these options and more here.
Finally, we can slightly improve the configuration of the tracing crate. We can disable its ansi feature since we won't be using it anyway, by disabling the default features in Cargo.toml:
= { = "0.3.17", = false, = [
"fmt",
"env-filter",
"json",
] }
We can also make it output JSON logs, disable some redundant information and make it configurable via environment variables:
fmt
.json
.with_env_filter
.with_max_level
.with_target
.with_current_span
.without_time
.init;
Conclusion
I'm a mere beginner in Rust and AWS, and I've sometimes struggled to find documentation on how to piece some components together. I hope this blog post will fill in some of the gaps for other people, and I'm very open to feedback and suggestions for improvement.